Article

How to Set Up Course Registrations
Starr CampbellTeaching any subject takes a great deal of preparation, and offering courses as a business requires an even higher level of organization. Scheduling multiple session courses that recur or take place over several days requires a software with this capability. This might include a multi-day seminar or conference that covers various subjects or disciplines. In each case, you need to provide an easy way for your audience to select the courses or seminars they prefer.
Many organizations provide their registrants with paper forms to fill out or a phone number to call to find out more about their courses and how to register. This can lead to a lot of extra work for you and a potentially bad experience for your audience. With paper forms, your registrants have no way to know if a course is already filled - they often have to select their top picks to ensure they get some of their preferred classes or seminars. An online scheduling tool creates a better experience for your participants and an easier process for your organization.
Whether you’re rolling out a new certification program or offering a week-long training session, you need a booking tool powerful enough to easily handle complex scheduling. Our software comes equipped with a full-scale class registration system that automates course registration - giving you more time to focus on being an effective instructor. Here’s the best way to add courses to your business with TimeTap.
Create a Course
At the top of your account dashboard, navigate to the Services & Classes dropdown menu. Click on the option to add a new course and wait for the information fields to appear.

Fill in your course details, including a well-thought-out description and necessary screening questions. If this is an advanced training, you might require participants to first complete the entry level course. You must enter the number of sessions needed to complete the course. This is helpful, if you require people to complete all the courses, or if only a certain allotment of courses is required. For example, a continuing education seminar might only require 4 courses out of all the offerings to meet the minimum requirement.
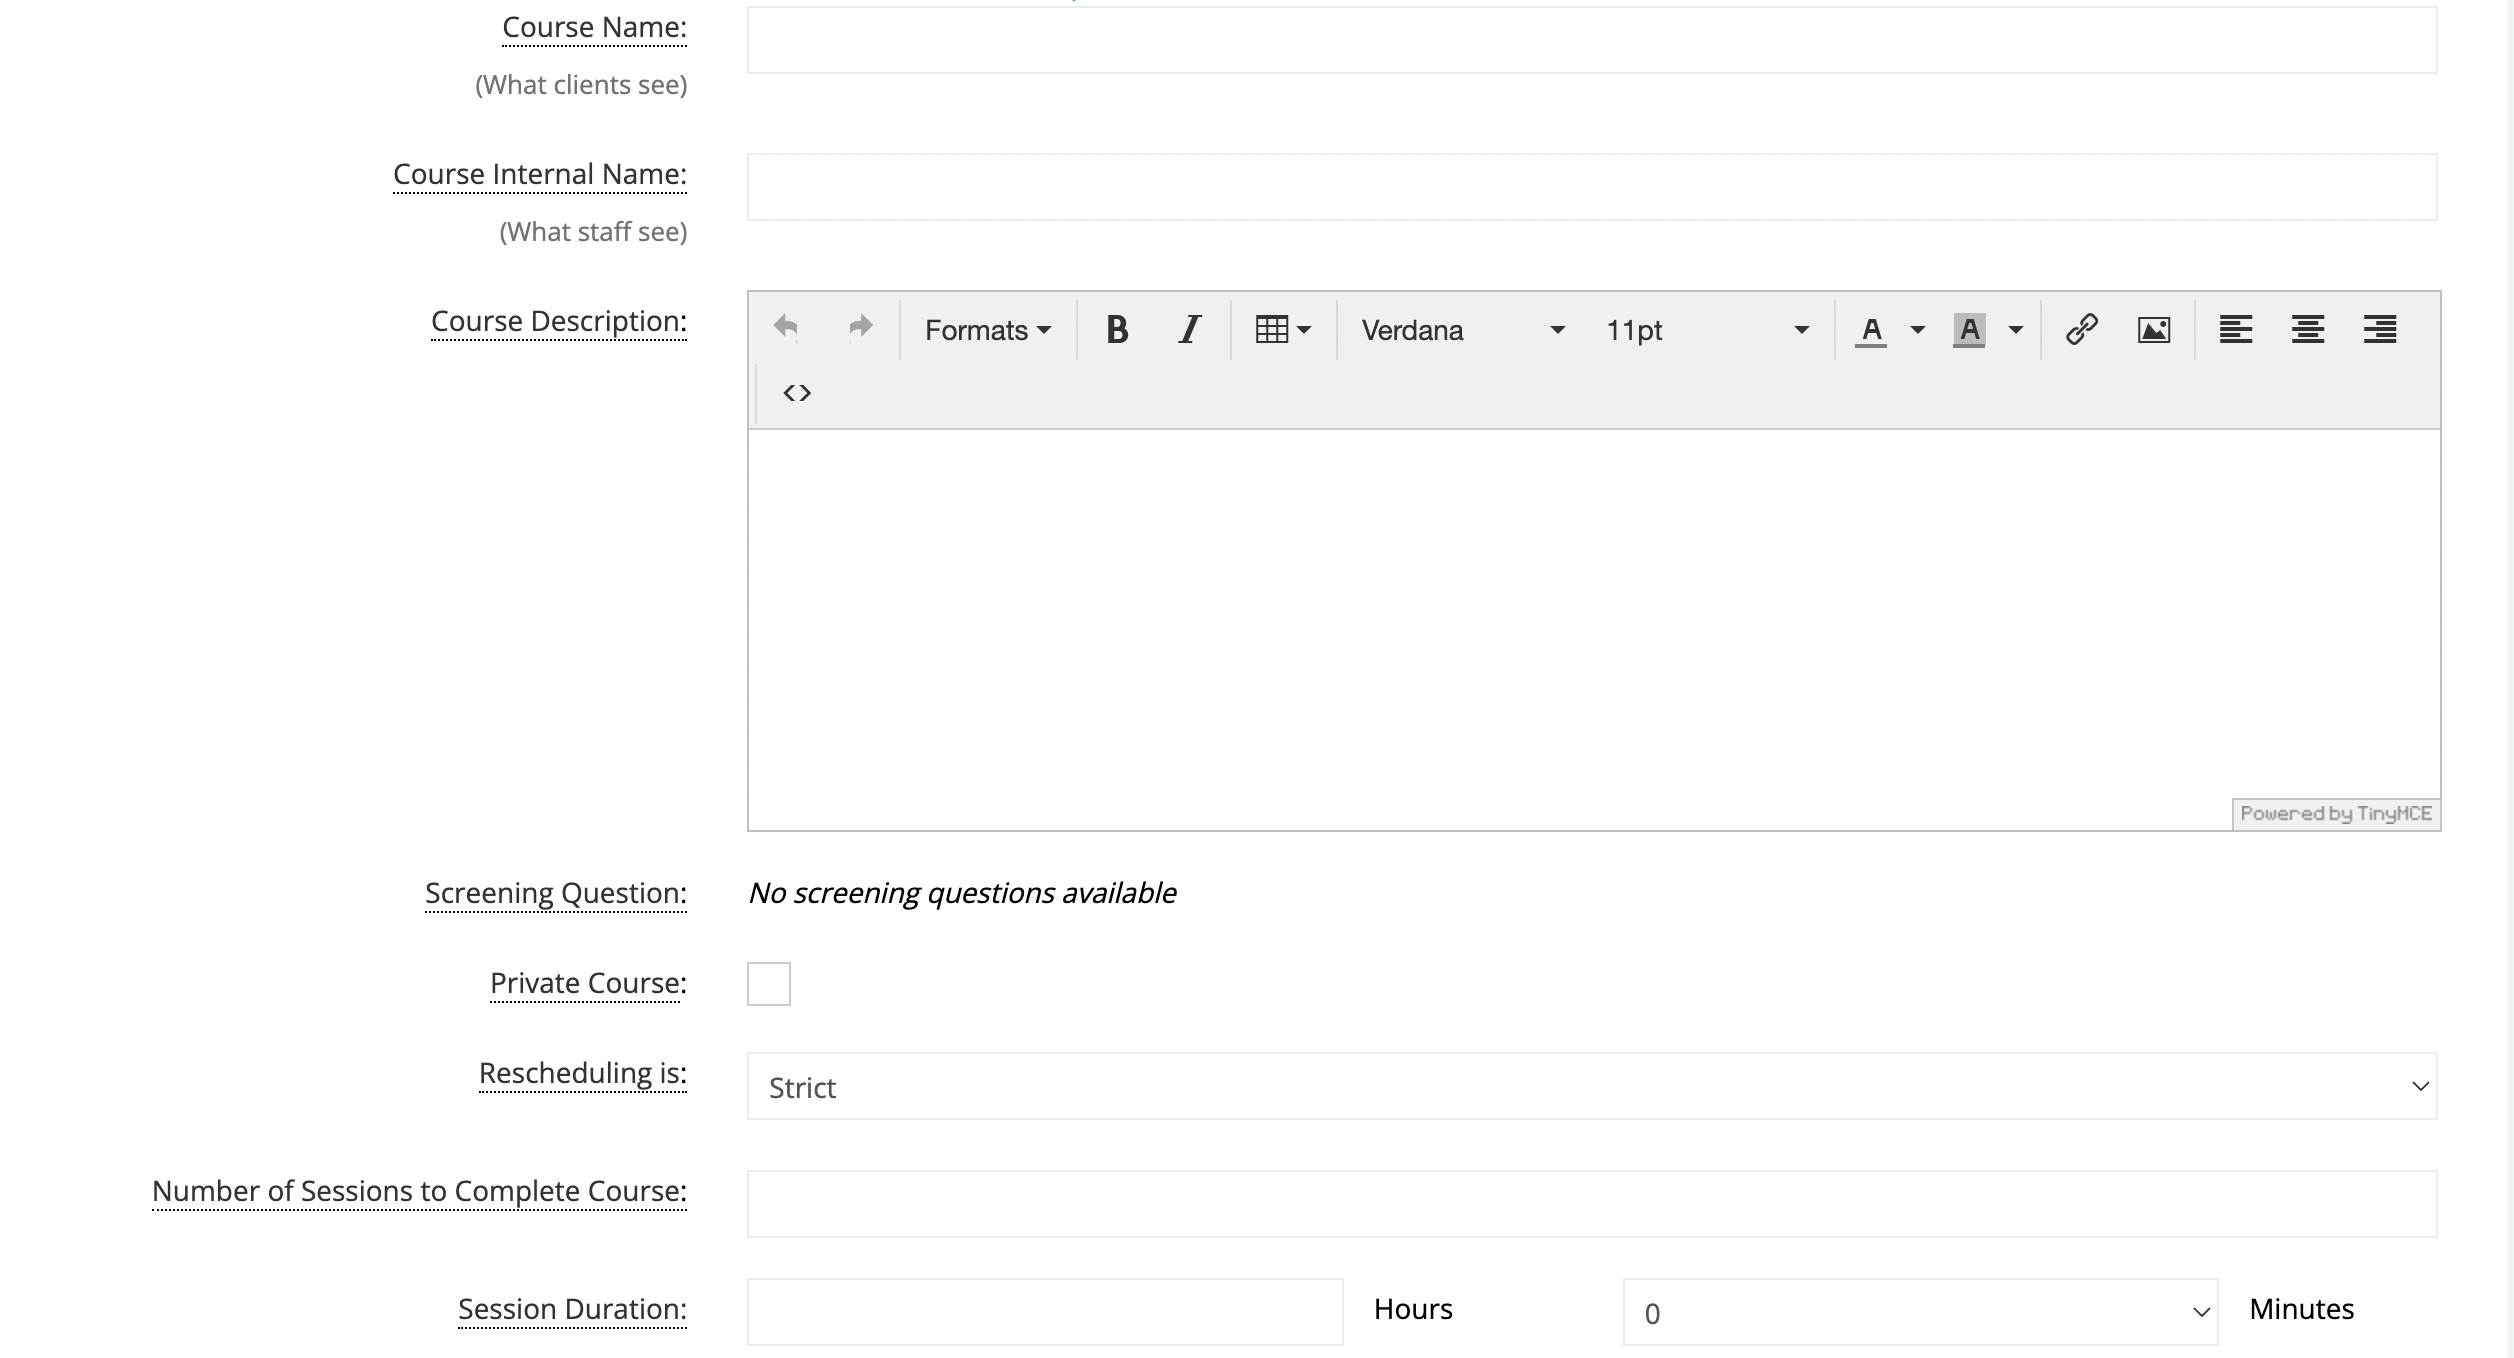
If you need clients to complete all courses, simply make sure the minimum number meets the number of courses offered. This way, clients cannot pick and choose which sessions they attend. Those who cannot attend all the sessions won’t be able to successfully book or complete the course. On this screen, you also have to enter the price of your course and, if applicable, the deposit needed to secure a spot.
Review Your Course Profile
After saving your new course, you will be redirected back to the Services & Classes page where you can see your course listed with your other services. To pull up your course profile, click the View button in the course’s Actions box.
The course profile in your account dashboard will reflect all the information your entered during the first step. You can view and edit a course’s available times, payments and scheduled appointments.
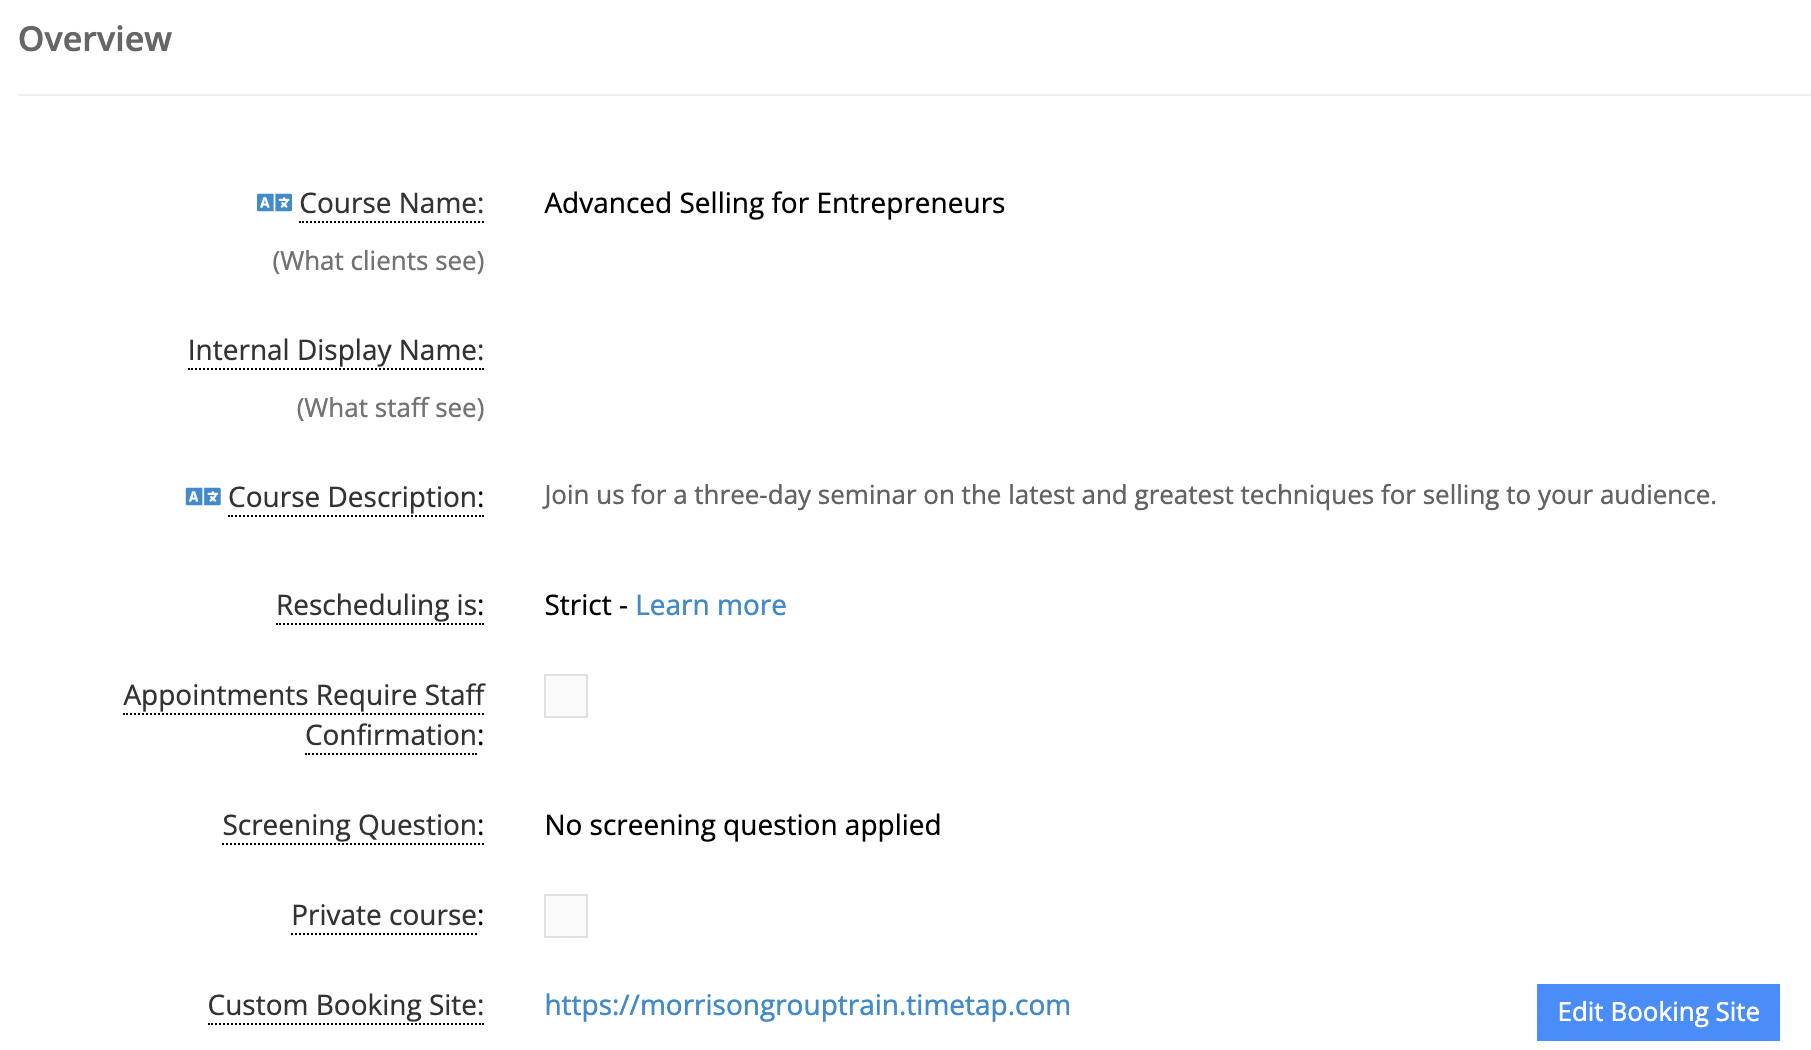
For organizations who only provide courses or need to separate them from other services, click the button next to ‘custom booking site’ to begin customizing a scheduling page specifically for your course. In addition to changing the site’s appearance to match your brand, you will be able to offer more information about your course to help convince prospective students to book.
Enter Payment Details
Under the payments tab, you’re prompted to enter the course’s price and the amount you require for a deposit. If you don’t want to ask for a deposit, uncheck the box underneath it. In certain cases, full payment upfront is necessary before a client can book a course. Simply check the respective box next to ‘Require Payment for Course’ and our system will ask clients for payment before confirming the appointment.
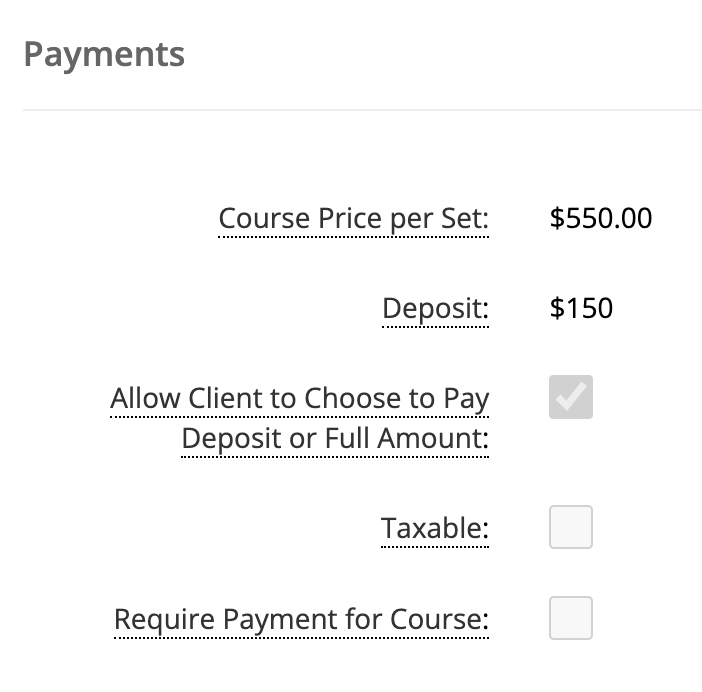
Your clients can secure their spot by paying through our LumaPay payment processing system. Our safe and easy to use platform accepts debit, credit cards, and digital wallets. You can even add discounts or coupon codes with our payments feature, if you have a returning group or want to run a special.
Add Scheduled Sets
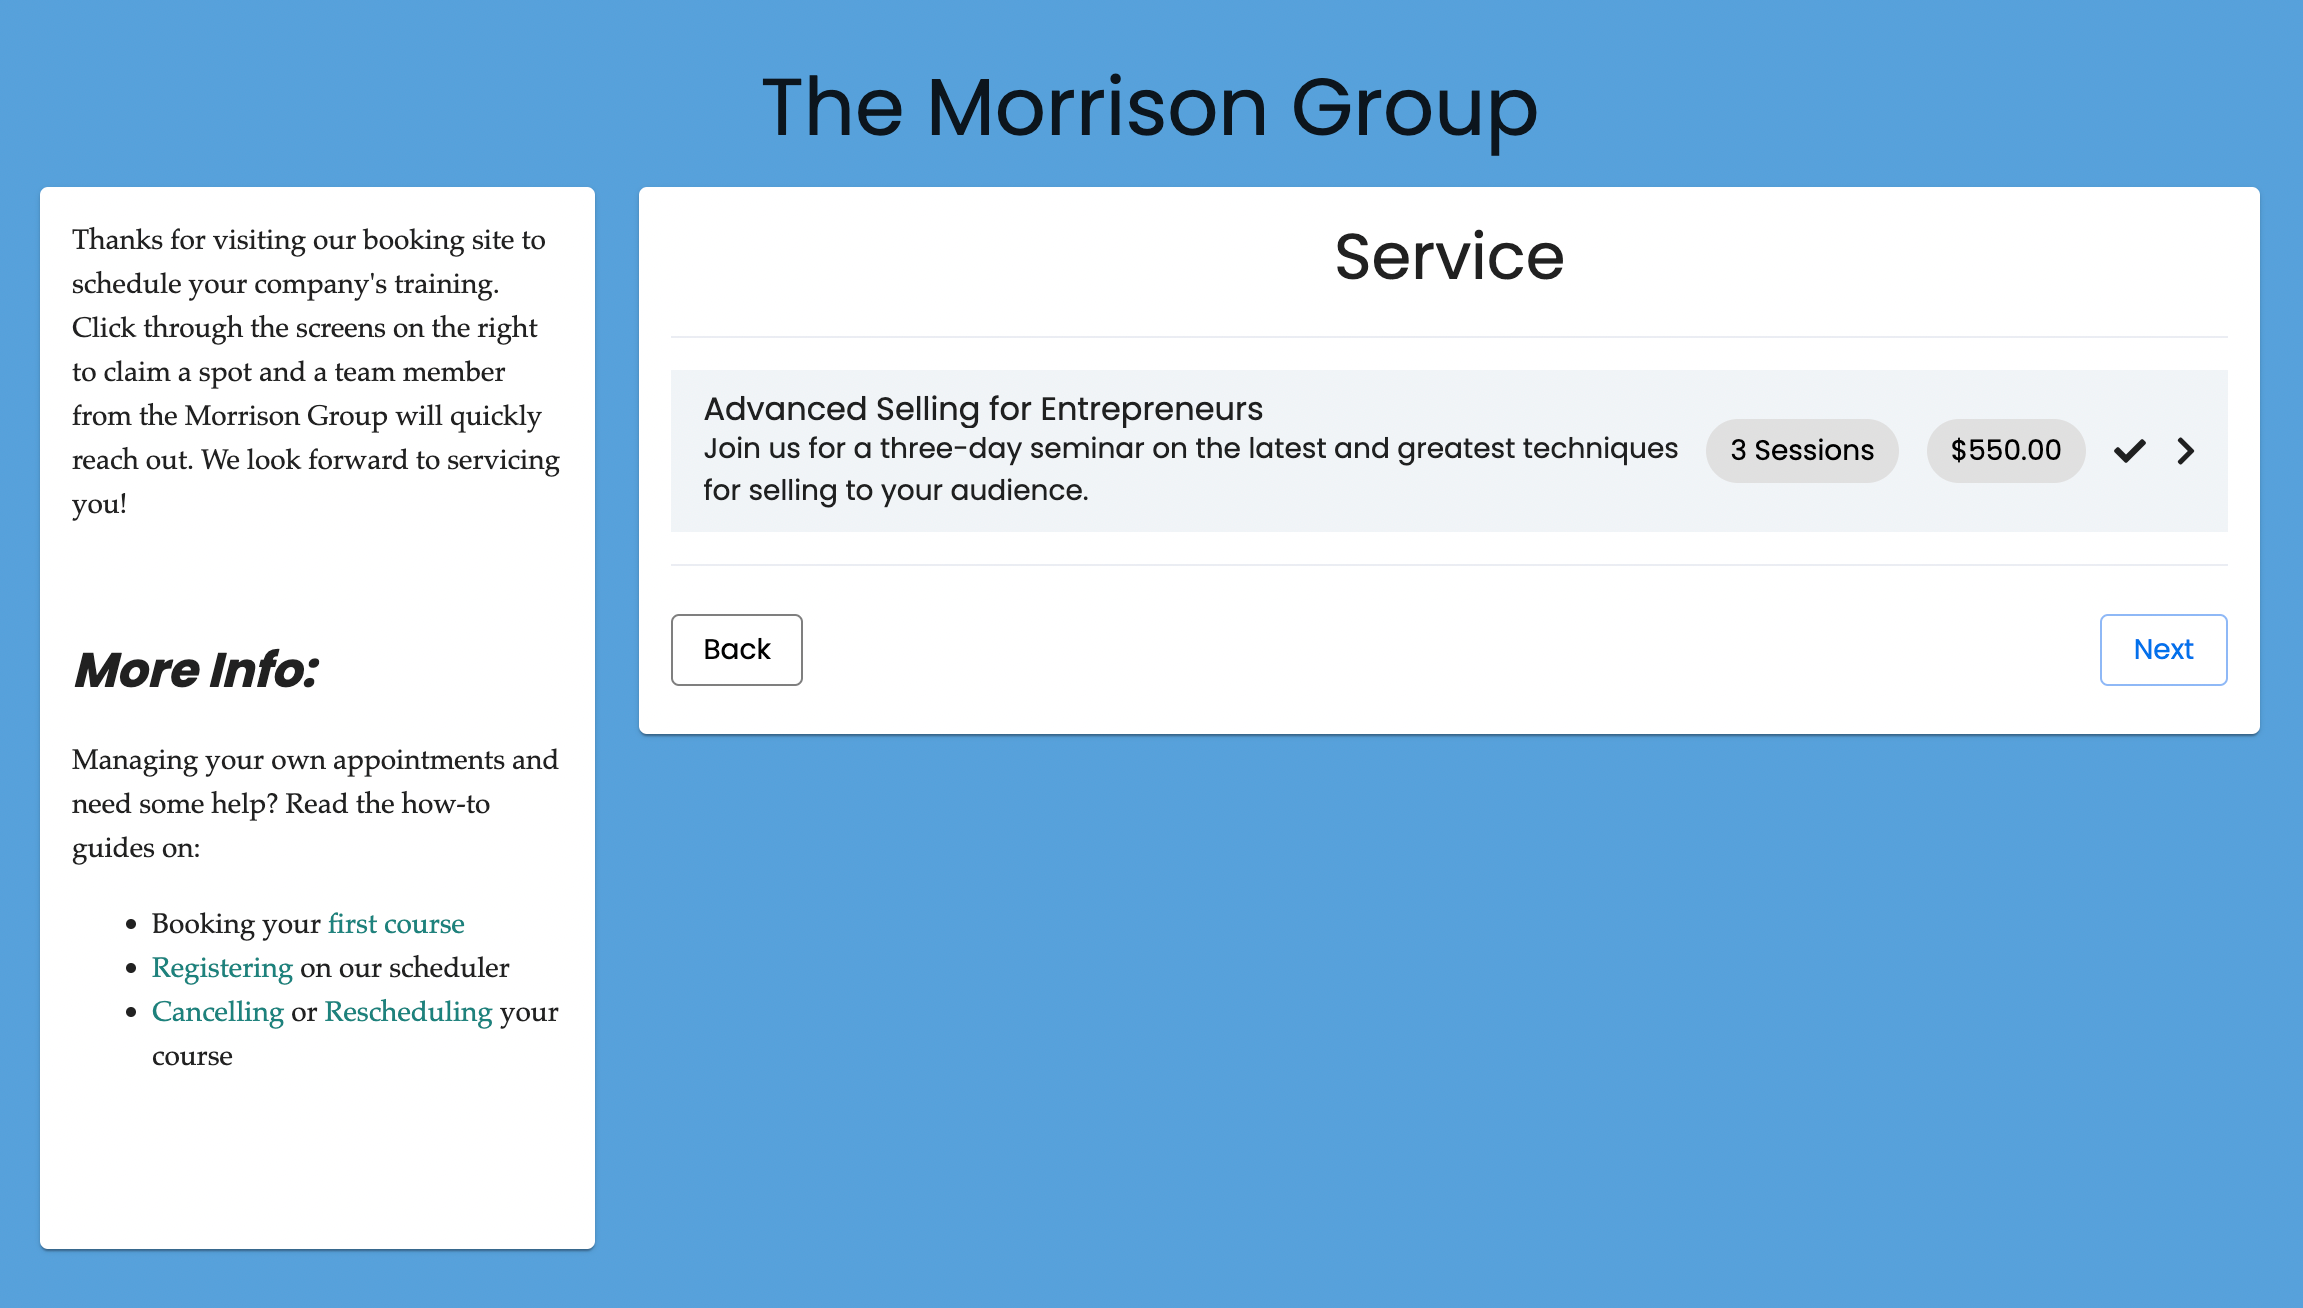
Before a course is ready to go live, you will need to set up its scheduled sets. A set is based on the number of sessions in a course, so you first must select the number of sessions you’ll be requiring. For example, the Morrison Group is a corporate training company that mainly offers courses on sales. The sales courses are broken down into three days of intense training and can be taken during a weekend long seminar, or over the course of three weeks.
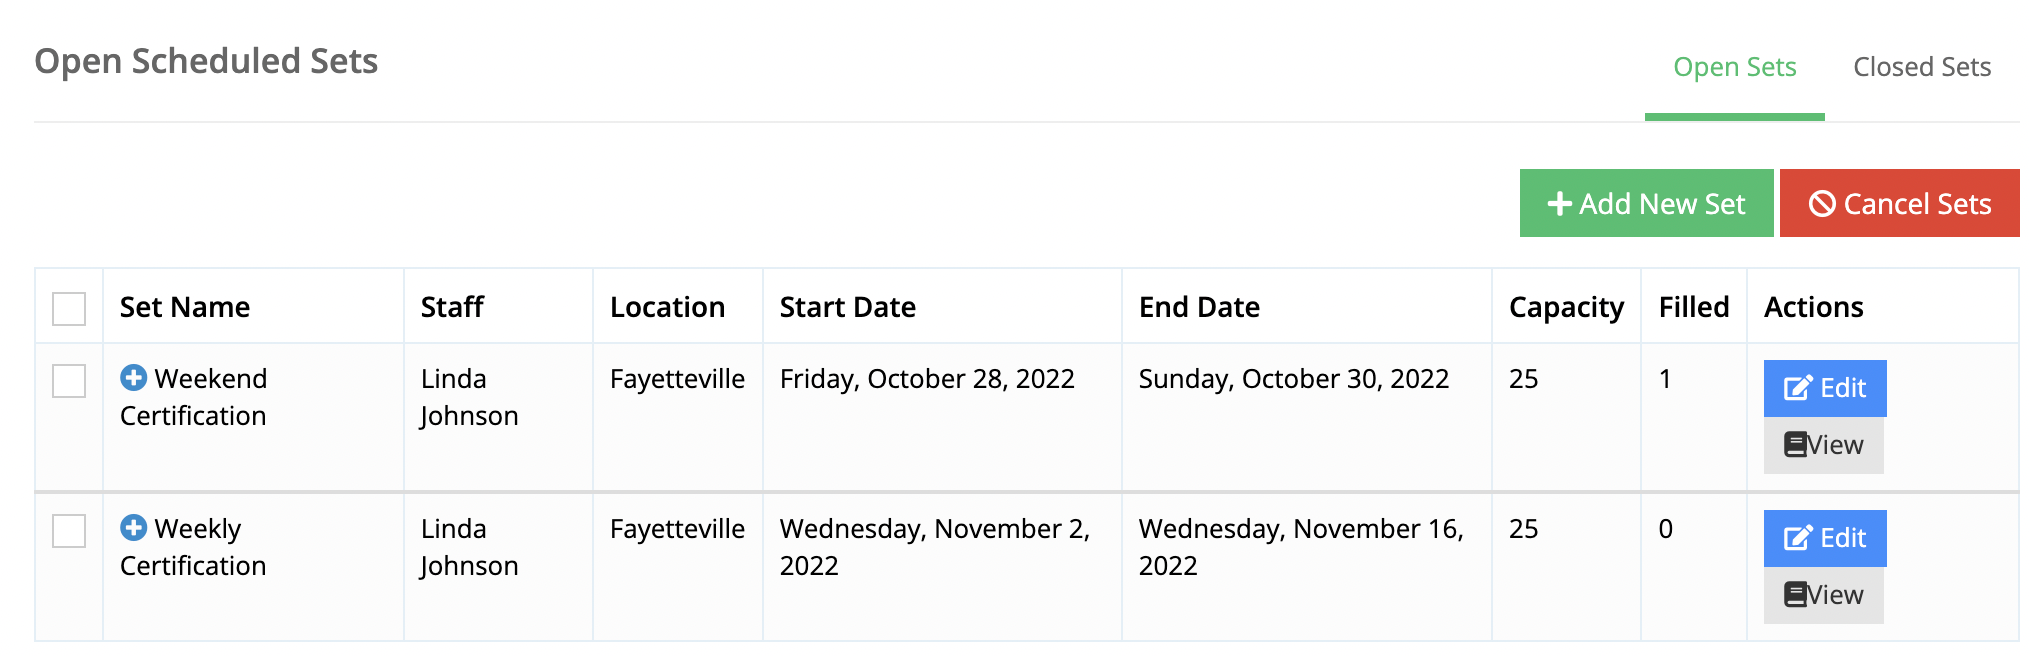
The Morrison Group’s courses are in scheduled sets of three. Since training programs are their primary service, the company chooses to offer courses on a weekly basis. Other businesses may have a longer duration for their courses or can only offer them periodically. If your course is ten sessions long, you could select ten days out of every other month and name your scheduled sets accordingly.
Test Your Booking Site
When you finish setting up scheduled sets, you’re ready to check out your booking site. It’s important to go through the scheduler yourself to get the client’s experience and make sure there aren’t any errors.
Your courses should appear under the service heading with the number of sessions and total cost. Clients can view the course description and important information on this screen before continuing to book.
Book a Course
Clients will be able to choose from all of your course’s scheduled sets. They can see how many seats are still available to make sure there’s enough capacity for themselves or members of their team.
Make sure you create as many scheduled sets as your staff can handle, because clients can only schedule what you’ve allowed. If you only opened sets for this month, you need to add sets for the remainder of the year so your course can keep getting booked.

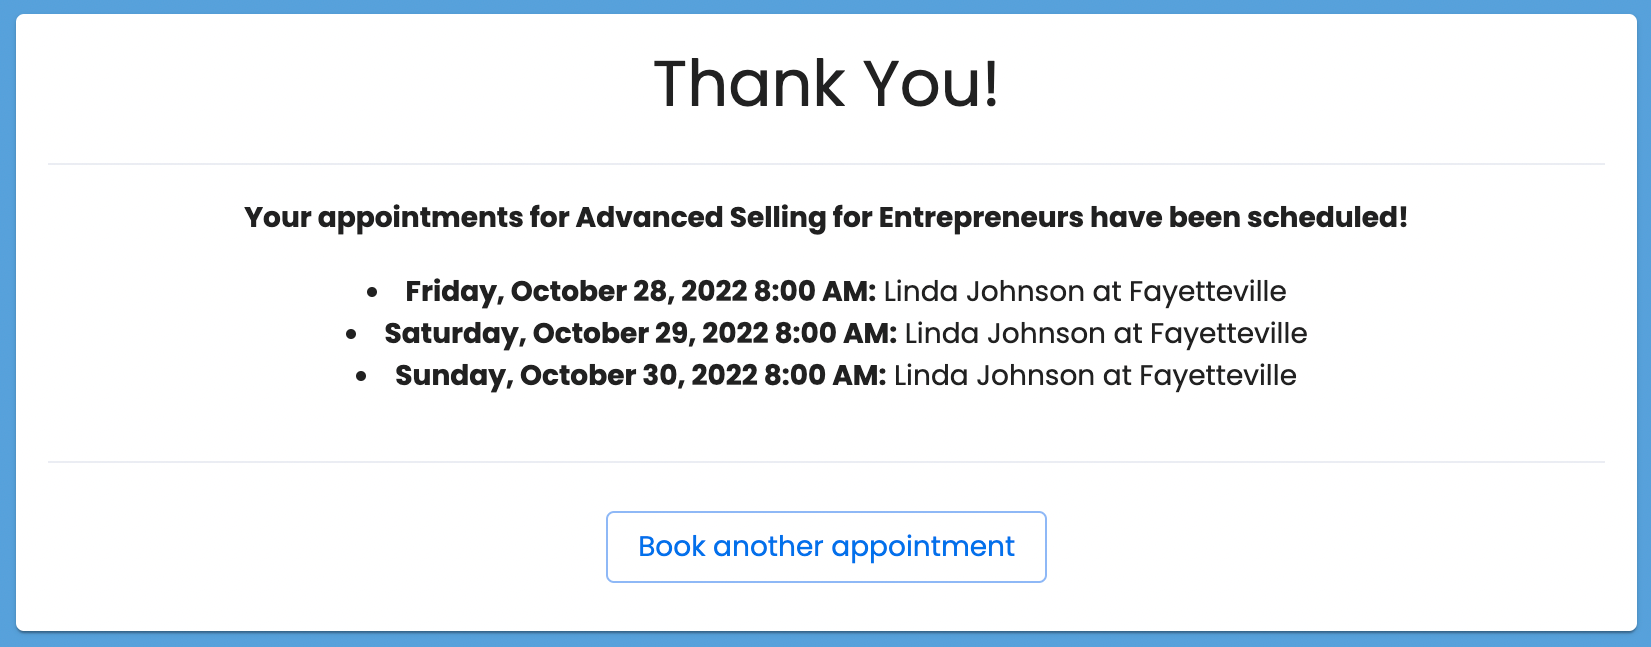
At the end of a successful booking, clients will receive this message. The exact date and times of the course, along with the instructor and location, are shown to ensure any errors are caught before it’s too late.
Set up custom automated emails that are triggered when a course is booked to prepare your future students even more. You can include directions to the location, a class materials list, or even a form to learn more about your class's needs before the course begins.
Courses are an advanced feature for premium subscribers, helping them simplify multi-day bookings and class scheduling. Our software automates course registration related tasks to increase operational efficiency for your organization. Staff will no longer need to focus on manual administrative work related to registration and can focus on more important efforts in your organization.
See how TimeTap can help you create the best course registration experience for your audience. You’ll be glad you did.


